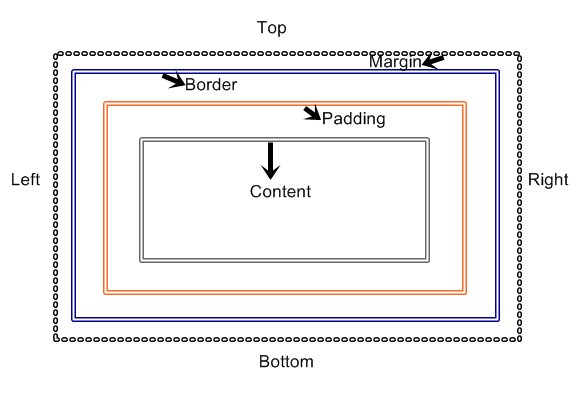
The CSS box model is essentially a box that wraps around HTML elements, and it consists of: margins, borders, padding, and the actual content.The box model allows us to place a border around elements and space elements in relation to other elements.
The image below illustrates the box model:
- Margin – Clears an area around the border. The margin does not have a background color, it is completely transparent
- Border – A border that goes around the padding and content. The border is affected by the background color of the box
- Padding – Clears an area around the content. The padding is affected by the background color of the box
- Content – The content of the box, where text and images appear
In order to set the width and height of an element correctly in all browsers, you need to know how the box model works.
Width and Height of an Element
Important: When you specify the width and height properties of an element with CSS, you are just setting the width and height of the content area. To know the full size of the element, you must also add the padding, border and margin.
The total width of the element in the example below is 300px:
width:250px;
padding:10px;
border:5px solid gray;
margin:10px;
Calculating the width:
250px (width)
+ 20px (left and right padding)
+ 10px (left and right border)
+ 20px (left and right margin)
= 300px
Imagine that you only had 250px of space. Let’s make an element with a total width of 250px:
width:220px;
padding:10px;
border:5px solid gray;
margin:0px;
The total width of an element should always be calculated like this:
Total element width = width + left padding + right padding + left border + right border + left margin + right margin
The total height of an element should always be calculated like this:
Total element height = height + top padding + bottom padding + top border + bottom border + top margin + bottom margin → Source W3School
Borders & Outlines
The border-style property specifies what kind of border to display. this is defined with the property “border-style”.
E.g border-style: solid;
Types of Border Styles Values :
This is Border Style Value “none” It displays no border
This is Border Style Value “Solid”
This is Border Style Value “Dashed”
This is Border Style Value “Groove”
This is Border Style Value “Inset”
This is Border Style Value “Outset”
This is Border Style Value “Ridge”
This is Border Style Value “Double”
This is Border Style Value “Dotted”
You can set the width & color of a border by using the property “border-width & border-color”
E.g. border-width: 20px;
E.g border-color: blue;
Consequently, you can style individual sides of the border by this declaration. First of all, you have to define the border, then followed by the side you want and final the kind of style you want attributed to the border, then you place your value. confused?
E.g. border-top-style: ridge;
doing it like this sets all border property for that particular side:
E.g. border-top: 1px ridge blue;
The Short-hand Property for borders is “border”.
E.g. border: 1px solid blue;
Working with Outlines
An outline is a line that is drawn around elements, outside the border edge, to make the element “stand out”.
The outline properties specifies the style, color, and width of an outline.
There are three properties
- outline-color : sets the color value
- outline-style: sets the style value of the outline
- outline-width: sets the width value of the outline
E.g. outline-color: blue; outline-style: dashed; outline-width: thick;
you can as well use the short hand property to declare everything in one line.
the syntax for outline short hand is color comes first, followed by style and finally the width, example given below.
E.g. outline: blue dashed thick;
Do a Combination of Borders & outlines to style any element in CSS to affect your HTML document. keep up the good work.
| Back | Main: CSS Programming | Previous Lesson: List & Tables | Next Lesson: Margin & padding |


your site says “Ajax error” after document ready
Thanks, just corrected that error!…